About Me

My photo
ATG Developer. Experienced in: ATG Commerce, ATG Search, BCC, CA, ATG Commerce Service Center

Tuesday, June 23, 2009

How to create ATG project in Eclipse

Creating New Project using Eclipse

1. File =>New=>Project...


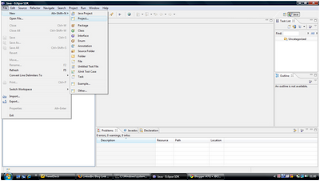
2. Click on Project...
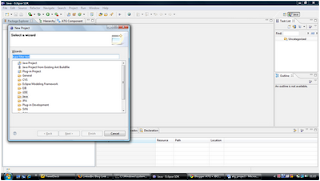
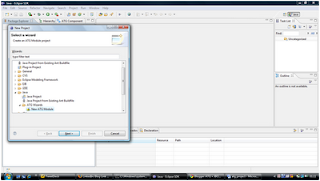


3. Select a wizard:
Java=>ATG Wizards=>New ATG Module


4. Click on Next button.


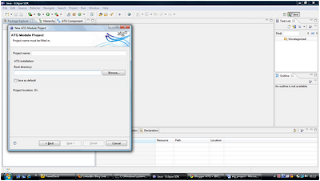
5. Enter project name i.e ‘myShoppingSite’ and ATG root directory i.e. ‘C:\ATG\ATG9.0’ (As per your ATG installation directory).


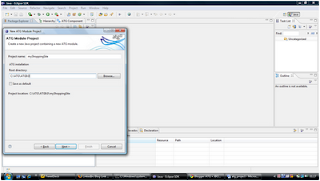
6. Click Next Button.


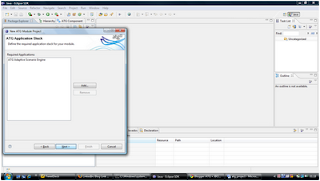
7. Click on Next button


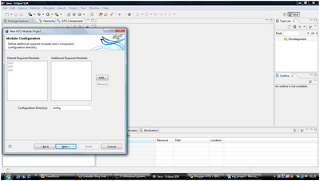
8. Click on Next button.


9. Click on Next button.


10. Enter J2EE application name: j2ee-apps
Enter Web application name: web-app
Enter Context-root: shopping


11. Click on Add button to add Target Application Servers.


12. Select application server i.e. ‘Jboss’ and click on OK button.


13. Click Finish button.


14. Congratulations!!!!!!!!!!!!!!!!!!! Project has been created.


Sunday, June 14, 2009

(ATG9 + jboss-eap-4.2) Make JBoss to work more efficiently..........

1. While installing JBoss, do not use the installer download; using that version results in errors.

2. Use the .zip file download.

3. After installing JBoss edit /bin/run.conf and run.bat with following settings:

JAVA_OPTS="-server -Xms2048m -Xmx3072m -XX:MaxPermSize=768m
-XX:MaxNewSize=768m -Dsun.rmi.dgc.server.gcInterval=3600000
–Dsun.rmi.client.gcInterval=3600000"

4. If you are setting up a JBoss instance that will be dedicated to lock management, you can run that instance with a smaller heap size, since the lock manager does not serve pages. To do this, ATG recommends creating a new run.bat|sh file referring to a new run.conf file.

5. Duplicate the run.bat|sh and run.conf files and rename the duplicates (for example, runLockMan.sh and runLockMan.conf). In the runLockMan.bat|shfile, change the following section to point to the new configuration file:

# Read an optional running configuration file

if [ "x$RUN_CONF" = "x" ]; then
RUN_CONF="$DIRNAME/LMrun.conf"
fi
if [ -r "$RUN_CONF" ]; then
. "$RUN_CONF"
fi

6. The runLockMan.conf file should include the following settings:

JAVA_OPTS="-server –Xms512m –Xmx512m -XX:MaxPermSize=128m -XX:MaxNewSize=128m -Dsun.rmi.dgc.server.gcInterval=3600000"

7. In order to create scenarios in the ATG Control Center (ACC), you must add the /client/jbossall-client.jar file to your class path. To do this, you can copy jbossall-client.jar into the /lib directory of an ATG module, then edit the MANIFEST.MF file of that module to indicate that jbossall-client.jar should be downloaded to the ACC.

Note that in order to protect your changes in case of future upgrades, you should not make this change in any of the provided ATG modules, but should create a module for this purpose.

8.For example, add the following lines to /MyModule/lib/MANIFEST.MF:
Name: lib/jbossall-client.jar
ATG-Client-Update-File: true OR

Another option is to copy jbossall-client.jar into the /lib directory of your standalone ACC installation, then modify the bin/startClient.bat file to include jbossall-client.jar in the class path.

Tuesday, June 9, 2009

JBPAPP-366 hotfix to your JBoss EAP 4.2.0

Problem Statement:

AJP connector leak is the problem with this distribution.
AJP connector leak that leaves threads in CLOSE_WAIT status. It may lead to deadlock condition.

ATG and JBoss EAP 4.2.0:
ATG9 supports JBoss EAP 4.2.0 distribution.

How to Fix:

The hotfix consists of a replacement for the jbossweb.jar file.

1. Download the replacement file(jbossweb.jar). download now
2. Copy the file into this directory:

"JBOSS_HOME/server/servername/deploy/jboss-web.deployer/"